1-Day Black Canyon Itinerary: Emerald Cave + Arizona Hot Springs

A one-day Black Canyon itinerary that includes Emerald Cave and Arizona hot springs is absolutely doable. It’s one of the most rewarding outdoor days near Las Vegas if planned right.
The idea is simple. Paddle a calm stretch of the Colorado River. Step into a glowing cave at the right time. Then hike into a hidden canyon where hot water flows through rock pools. It sounds like a lot. But when the day flows well, it feels natural, not rushed.
Why Combine Emerald Cave + Arizona Hot Springs in One Day?
At first, it may seem like too much for one day. Kayaking and hiking in the desert? That can feel intense. But the route works because everything sits along the same stretch of river.
Here’s why people pair them:
- Both spots lie within the Black Canyon Water Trail
- The river is calm, so paddling is manageable
- The hot springs hike is short but steep, not long
- You get two very different experiences in one trip
One moment, you’re floating through quiet canyon walls. Next, you’re climbing a rocky path toward steaming pools. That contrast is what makes the day memorable.
Still, a fair question comes up.
Is this okay for beginners?
Yes, with the right pacing and some planning. But it’s not a lazy day either.
Starting Point: Where the Day Begins
Most full-day routes begin near the base of the Hoover Dam. This stretch of the Colorado River feels calm and steady. No rough rapids. No sudden surprises. Just a slow-moving current guiding the way.
Launching early matters more than people expect.
- Morning air is cooler
- Winds are lighter
- Water traffic is minimal
- Light is softer for photos
By 10 or 11 a.m., the desert heat starts to build. And it builds fast. Starting early is not just about comfort. It’s about energy for the hike later.
How to Reach Black Canyon
Getting to Black Canyon is simple once you know the route.
Driving from Las Vegas
Most visitors start from the Las Vegas Strip. The drive is short and scenic.
- Distance: about 30–35 miles
- Time: 45 to 60 minutes depending on traffic
- Route: Head toward Boulder City, then follow signs for Hoover Dam or Willow Beach
Where to Park
Parking depends on how you plan your route.
- Willow Beach Marina (common access point)
- Large parking lot available
- Easy river access
- Restrooms and small store on site
- Good option for shorter paddles or shuttle setups
- Hoover Dam launch area (for full downstream route)
- Used for longer itineraries toward Willow Beach
- Parking is more limited and regulated
- Often used by guided tour operators
Cell Service Reality
Here’s something important. Cell service is very limited once you leave the main highway.
- Expect little to no signal near the river
- GPS may stop updating in canyon areas
- Download maps or directions in advance
Permits and Entry
This area falls under Lake Mead National Recreation Area.
- Entry fees may apply per vehicle
- Water access requires permits for paddling
- Rules can change, so checking ahead helps
Hotel Pickup Options
Not everyone wants to drive early in the morning. That’s where guided options become useful. Tours by Evolution Expeditions, offer:
- Pickup from select Las Vegas hotels
- Transport to and from the launch site
- Gear and safety briefing included
This makes the day feel smoother, especially for first-time visitors. No parking stress. No navigation worries. Just show up and start the experience.
Stop 1: Emerald Cave (Timing Matters More Than Distance)
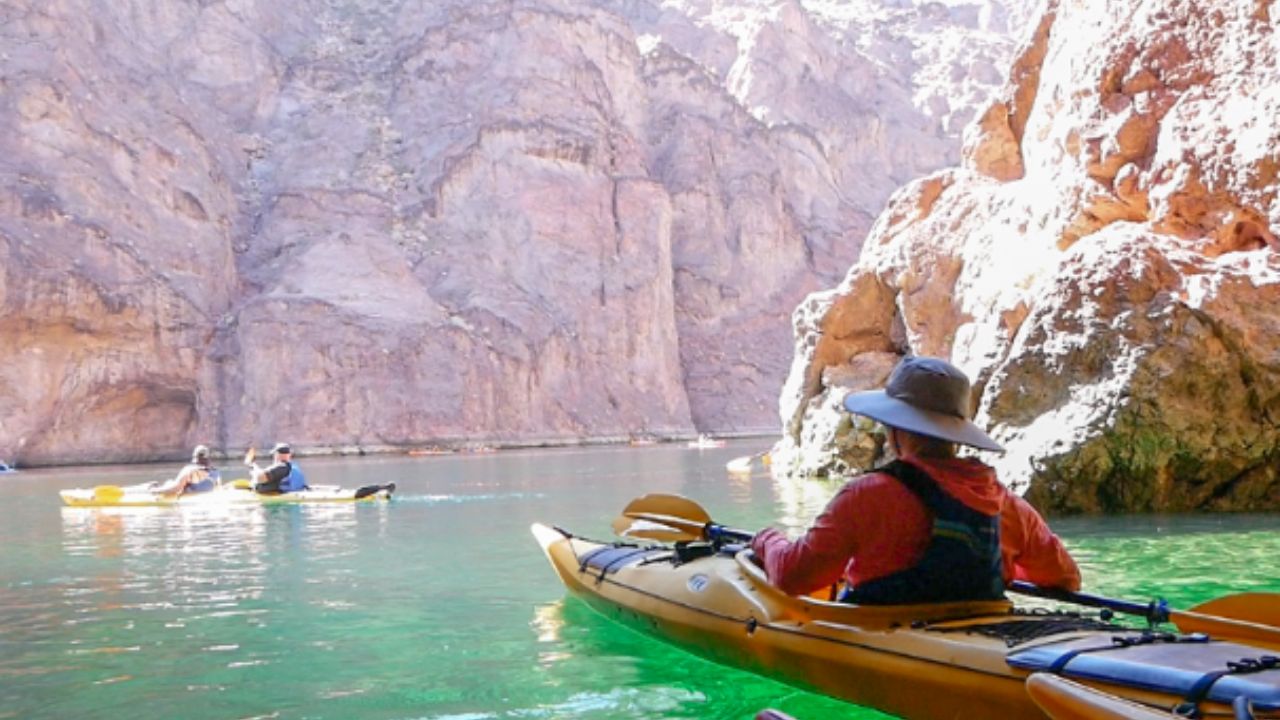
Emerald Cave is easy to reach by kayak. But the experience inside depends completely on light conditions.
The famous green glow is not always there. It happens because of a mix of things working together. Sunlight has to enter the cave at a low angle. This is usually late in the day. When that light hits the water, it reflects in a way that makes the color appear bright green. The water itself also plays a role. The Colorado River system here feeds into Lake Mead. The water is generally very clear. Small natural algae in the water and the way light passes through it adds to that emerald effect.
When the Glow Actually Shows Up
- Usually best in late morning to mid-afternoon
- Timing changes slightly with seasons and sun position
- The glow window is often short and very specific
- Outside that window, the cave looks much more normal
What If You Miss the Glow Window?
It’s completely normal to miss it on your first try. If that happens, the experience is still worth it.
Here’s what you can still enjoy:
- The calm, narrow canyon walls around you
- The peaceful sound of water with no rush or noise
- The unique feeling of sitting inside a natural rock cave
- Beautiful reflections on the water, even without the green glow
Photo Tip
If you are there during the glow, keep it simple. Sit low in your kayak so the camera captures more water and less sky. Stay still because even small movements can break the reflection. Let the light do the work instead of trying to force the shot.
Exact Emerald Cave Glow Timing by Month
The glow inside Emerald Cave changes through the year as the sun shifts position. Here’s a simple month-by-month guide to help you get it right.
| Month | Best Time Window | What to Expect |
| January | 11:00 am – 1:00 pm | Lower sun angle, softer glow |
| February | 10:45 am – 1:15 pm | Light starts getting stronger |
| March | 10:30 am – 1:30 pm | Brighter and more consistent glow |
| April | 10:15 am – 1:45 pm | One of the best months for visibility |
| May | 10:00 am – 2:00 pm | Strong light, longer window |
| June | 10:00 am – 2:00 pm | Bright glow but hotter conditions |
| July | 10:00 am – 2:00 pm | Similar to June, but heat is intense |
| August | 10:15 am – 1:45 pm | Slight shift as sun begins to change |
| September | 10:30 am – 1:30 pm | Balanced light and cooler air |
| October | 10:45 am – 1:15 pm | Shorter window, softer tones |
| November | 11:00 am – 1:00 pm | Glow is visible but less intense |
| December | 11:00 am – 12:45 pm | Shortest window of the year |
These are general ranges. Cloud cover, season shifts, and canyon shadows can slightly change the exact moment.
How to Plan Around It
If Emerald Cave is a priority, plan the rest of the day around it.
- Start early from the launch point
- Paddle at a steady pace without rushing
- Aim to reach the cave within your month’s window
Guided trips often build their schedule around this timing. That takes the pressure off planning every detail yourself.
Paddling Between Stops: The Real Experience
After leaving the cave, the river opens up again. This part often becomes an unexpected highlight. Why? Because there is no rush.
The canyon walls rise high on both sides. The water stays calm. And the silence feels real. Not the kind you get in a city park. This is deeper.
Along the way, you may notice:
- Small sandy beaches for short breaks
- Warm pockets of water near the shore
- Birds gliding above the canyon
- Desert plants clinging to rock walls
At times, the river almost feels like a natural lazy drift. No effort needed. Just gentle paddling and long pauses.
This is where many people slow down without planning to.
Reaching Arizona Hot Springs: What to Expect on the Trail
There are actually two common ways to reach the trail. Both feel very different depending on how you start.
Option 1: River Access (Colorado River Route)
Most people start by arriving on the Colorado River side first. From here, the journey continues on foot.
- You pull off at a designated river access point
- From there, you look for the trail entrance heading inland
- The path quickly leaves the river behind
- Then the landscape turns into dry, rocky desert canyon terrain
What the hike feels like
The distance from the river access point to the hot springs is roughly 3 miles one way. On paper, it sounds manageable. But in reality, it feels more demanding. This is because of the desert heat and terrain.
As you go deeper, the trail becomes more interesting and more technical:
Canyon sections
The path narrows into slot canyon walls in several areas. These walls rise on both sides. It makes the trail feel enclosed and shaded at times. It’s one of the most visually striking parts of the hike.
Ladder climb
At one point, there is a metal ladder section built into the rock. This helps you move between levels of the canyon safely. It adds a small adventure element to the hike.
Creek walk
Closer to the springs, you may end up walking through shallow water sections. The creek flows gently in parts. You might need to step through or along wet rock depending on conditions.
Rope-assisted areas
There are also short rope-assisted sections in steeper spots. These are not extreme. But they help with balance as you move up or down uneven rock surfaces.
Option 2: Land Access via Highway 93 Trailhead
Here, you can begin from the Highway 93 trailhead access point. This route is:
- A land-based approach into the canyon system
- Popular with hikers who are not using boats or river entry
- More direct in terms of starting the trail inland
From this side, you still descend into the same canyon network that leads toward the hot springs. However, the feeling is slightly different. It’s because you begin at a higher, drier desert entry point.
No matter which route you choose, the desert conditions make a big difference. The hike can feel much tougher in peak heat. That’s why most experienced visitors prefer:
- Fall
- Winter
- Early spring
During these months, the trail feels more manageable. The canyon sections are still adventurous. But the heat does not drain you as quickly. So, the hot springs feel more relaxing once you reach them instead of overwhelming them.
Inside Arizona Hot Springs: What It Feels Like
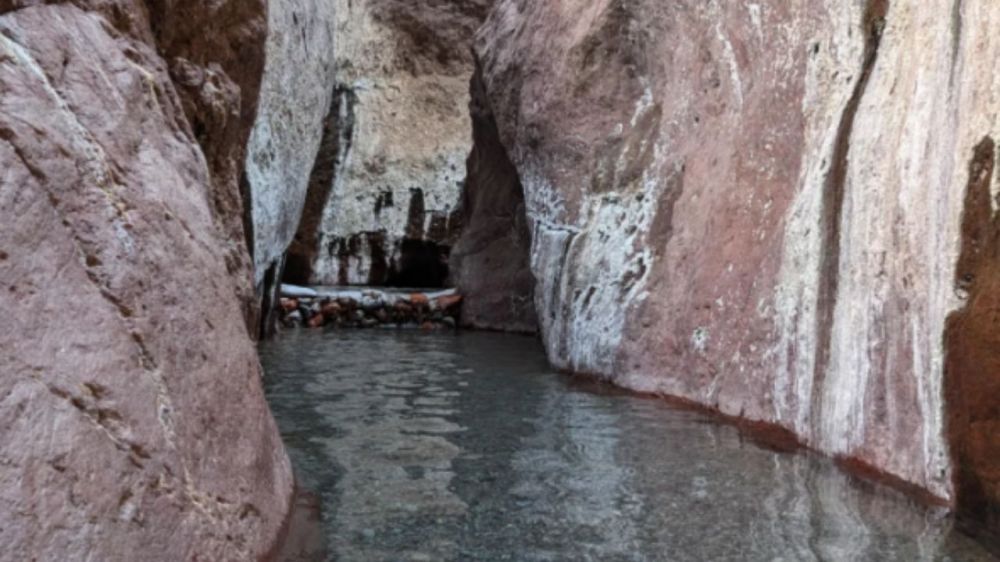
This is where the experience changes again.
The pools are formed by mineral-rich water flowing down the canyon. Each level has a different temperature. The higher you go, the hotter it gets.
The setup feels simple but unique.
- Stone pools stacked like steps
- Warm to very hot water
- Steam rising in cooler weather
- Canyon walls closing in around you
At the top, the water can reach around 110°F. This is far hotter than most people expect. It is often too hot for extended soaking
So the best approach is simple.
- Test each pool slowly
- Stay hydrated
- Take breaks between soaks
After a paddle and a short hike, sitting in warm water inside a quiet canyon feels earned. Not like a resort. More raw and real.
Do You Need a Guide for This Itinerary?
It depends on your experience. Here’s a simple way to think about it.
Self-Guided Trip
Good if:
- You are confident with kayaking
- You understand river access points
- You can plan permits and timing
Challenges:
- Finding the correct trail to the hot springs
- Managing time between stops
- Handling permits for the area
Guided Experience with Evolution Expeditions
Better if:
- It’s your first time
- You want a smooth, stress-free day
- You prefer local insights along the way
What stands out here is not just convenience. It’s how the day is structured. Guides help with timing, especially for Emerald Cave. They also handle logistics like permits and gear.
Some tours even combine paddling with stops that feel natural, not rushed. Snacks, water, and rest breaks are planned into the flow of the day.
That difference matters more than expected.
Permits, Costs, and Practical Details
It’s important to know about permits before planning your trip.
Permits
- Required within Lake Mead National Recreation Area
- Needed for launching and paddling when not on a tour
Typical Costs
| Type | Cost Range |
| Self-guided (rental + permits) | $50–$100 |
| Guided tours | $100–$180 per person |
Distance and Time
- Full route: up to 12 miles (depending on start point)
- Total time: 6 to 8 hours with stops
That sounds like a long day. But it doesn’t feel rushed when paced well.
What to Pack for the Day
Packing right can make or break the experience.
Must-have items:
- Water (more than you think you need)
- Light snacks or packed lunch
- Sunscreen and hat
- Water shoes or sandals with grip
- Dry bag for phone and essentials
Nice to have:
- Lightweight towel
- Change of clothes
- Small first-aid kit
And one small but important tip. Avoid heavy backpacks. The hike to the hot springs feels much harder with extra weight.
Common Mistakes to Avoid
Even well-planned trips can go wrong with small mistakes. Here are a few to watch out for:
- Starting too late in the day
- Missing the Emerald Cave light window
- Underestimating the heat during the hike
- Not carrying enough water
- Rushing between stops
The day works best when it feels unhurried. Trying to squeeze everything too fast takes away from the experience.
Best Time of Year for This Itinerary
Timing can change the entire feel of the trip.
Best Months
- October to April
Why these months work
- Cooler air for paddling
- Comfortable hiking conditions
- Better overall energy levels
Summer is still possible. But it requires serious planning.
- Start very early
- Take longer breaks
- Avoid midday hiking
How the Day Stays With You
Some trips feel fun in the moment and fade later. This one tends to stick.
Maybe it’s the shift between water and rock. Or the way the cave lights up for just a few minutes. Or the quiet inside the canyon when everything slows down.
It’s not just about checking off two spots on a list. It’s about how the day unfolds.
You start with calm water. Then chase light inside a cave. Then climb into heat rising from the earth itself.
By the end, one thought often lingers.
Was it the glowing cave that stood out more, or the stillness of those hot pools hidden deep in the canyon?
FAQs
1. How long is the hike to Arizona Hot Springs?
The hike is about 3 miles one way from the river access point. It is not very long, but the desert heat and rocky terrain can make it feel more tiring than expected.
2. Is the Arizona Hot Springs hike difficult?
It is a moderate hike overall. However, narrow canyon walls, rocky paths, a ladder section, and some creek walking can make it feel more adventurous than a normal trail.
3. What is the best time of year to visit Arizona Hot Springs?
The best time to visit is fall, winter, and early spring. During these months, the weather is cooler, so the hike feels easier and more comfortable compared to the hot summer season.
4. Can you access Arizona Hot Springs without kayaking or river entry?
Yes, you can also reach the trail through a land-based route starting from Highway 93. This option allows you to hike into the canyon without starting from the Colorado River.
5. Are there ropes and ladders on the trail?
Yes, there is a short metal ladder and a few rope-assisted sections. These are simple to use but require careful footing while moving through the canyon.
6. Do you walk through water on the hike?
Yes, in some parts of the trail you may walk through shallow creek water, especially near the hot springs area. The depth and flow can change depending on conditions.
7. Is the hike safe for beginners?
Yes, it can be safe for beginners who are reasonably fit. It is important to start early, carry enough water, avoid extreme heat, and move carefully on rocky and ladder sections.